Wednesday, January 22, 2014

Favorite Skin Care Products and Routine


I did my favorite makeup but I think my favorite skin care products are in order. Skin care is something I've had to teach myself a lot about. I had acene in the middle school and the beginning of high school. I broke out mostly on my forehead and some on my cheeks. I still have break outs from time to time but nothing like my face used to be when I was young. I've tried all kinds of products. I've even tried things like proactive and others like it.

The most important thing to understand first and formost is no ones skin is the same. I spent years trying things people claimed work for them and getting frustrated because it wasn't doing the same for me or fast enough. Not everyone is going to react the same way to the same product. I've learned what has worked for me and now I know what to look for when shopping for skin care products. 

I have what they call combination skin but it tends to get oily more than dry. What I have noticed is my pores clog easily and creates pimples, I am blackhead prone, and I only get oily/dry in specific places. If this sounds like you maybe my suggestions will help! 
When looking for skin care products I always look to make sure it says oil free. For me this is very important especially in moisturizers. 


My nightly face wash:
Alba Botanica - Natural Even Advanced Cleansing Gel
I have been using this for months and I have no intention on switching it's perfect for daily use. It's not too abrasive just leaves you with a good clean feeling that isn't drying. I use it about every night or whenever I need to wash my face really. Having healthy skin is way more important to me than any makeup I could put on my face. I buy it at Target and it's the only place I've found it. The brand is sold other places but this specific fash wash I've only ever found at Target for about $11. 


My must have makeup remover/cleanser:
Simple - Cleansing Facial wipes
This makeup remover is a cleanser as well as a makeup remover it has worked wonderfully for me. On nights when I'm out late or I don't feel great or just in a hurry to get to bed I use this in place of my fash wash. I don't do that often but it works. You can get this at Target or Walmart or most drug stores. 


My daily moisturizer:
Alba Botanica - natural Hawaiian oil free moisturizer
This moisturizer I've been using as long as I've used my face wash. It is of coarse oil free which, for me it is a necessity. It doesn't go on thick or feel like you're wearing a mask when you put it on. (I hate that feeling) I use this every night and sometimes during the day when necessary. This cost more than and average drug store mositerizer but its worth it to me. This moisterizer lasts a long time. A little definetly goes a long way it's not something you have to drown your skin in. You can get this at Target or Walgreens for around $20-$23


My exfoliator:
Clean & Clear - Deep Action Exfoliating scrub
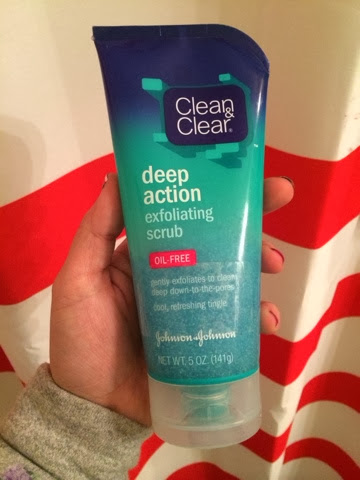
I've used this exfoliator for years. Like I said I am prone to blackheads especially on my nose and chin. I don't recommend using this daily it's a little to harsh on your skin to be used daily. I use this once a week or just when I feel like my skin needs a little more help getting ride of death skin cells. You can get this anywhere from target to Wal-Mart to any drug store.


That's it! I don't like using too much or too many different kinds of products on my face. Once I find something I really like, I stick to it. If it works it works! 

Side note: I just bought the B.Right! Intro kit from Benefit. Benefit cost much more than any of the products I'm currently using but I'm pretty excited to use it. I'll let you know how it goes. Maybe I'll write a review on it. 


Hopefully I've been helpful in anyway. If you have any other suggestions let me know! 
If you like or dislike posts like this let me know too! 


Monday, January 20, 2014

Down with the Thigh Gap


Dear Mocha,

One of the most disturbing trends is the thigh gap. I can't even stand it. It's such an unhealthy goal and standard to try and set for yourself. To strive to be so thin in a distinct place that isn't meant to be so tiny. Unless somehow you are naturally that tiny you would have to go through extreme measure to get yourself there. I'm not talking about a natural space between your legs I'm talking about the unhealthy strive to be skin and bone.
Its not cute, its not attractive. Its honestly scary.  
These are just a couple pictures I found on Tumblr. It's absolutely ridiculous and horrifying that young girls actually look at this and strive toward it. Reading some of the post that go along with these pictures are full of self hate and unrealistic goals. It's so sad that girls view themselves as so far from beautiful. Wanting to be fit and healthy is ok. Wanted to be so thin, that the only way to achieve it is starve yourself or be unhealthy is not ok.


Does Beyoncé have a thigh gap!? Does JLo have a thigh gap!? Does Jennifer Lawrence have a thigh gap?! What about Marilyn Monroe? I don't think so! And if their standards arent good enough for you than you have to know that your perception of perfect is warped.

Werk 

Being a twig isnt beautiful in fact being "skinny" isn't beautiful. Being healthy is beautiful. Confidence is beautiful. Your size doesn't define perfection or beauty or who you are. 
Everyone doesn't love everything about their body and it's ok to set goals but not goals that are harmful to you. 

To be completely honest I don't love my thighs everyday. Do I think to myself I could lose some weight? Yea most women do. But I would never work toward a "thigh gap" goal and I don't beat myself up over it. I would never set an unhealthy goal for myself. Even though I may not always like certain parts of my body I do love my curves. 

I know it might be hard but love who you are. 
If this doesn't really apply to you than that is great honestly, but if you know someone that this does apply to. Encourage them and help them. Most of our insecurities as females stem from other women whether it's comparing or competeing. You are beautiful. Love yourself. You deserve it. 

Love, 
Mickey 

Thursday, January 16, 2014

Easy Mini Pies

At work we had a Christmas lunch pot luck type thing before Christmas. I wanted to make something easy but fun so I made mini pies! They are cute and not difficult at all to make! I made half apple and half cherry. I love pie and I love making guilt free pies but for the holidays it's ok to splurge. I definetly did! 


Here's what you'll need: 
Muffin tin (I actually have a cupcake maker that I use for everything) 
A mixing bowl medium or large

For the filling: 
2 Granny Smith apples, cored peeled and cut into small pieces that will fit in a muffin tin
1 tablespoon of all purpose flour 
1/2 cup of sugar 
1 teaspoon of cinnamon 
I didn't make my own cherry filling for time purposes. I just used can filling.


For the crust I bought 2 packages of pre made pie crust, it made things a lot easier.


First mix all the ingredience for the apple filling together, simple enough right? Then I cut the circles in the pie crust and pieces for the lattice. I washed the bottom of cans for a template. 


Then place the circles you cut out into your muffin pan and fill with the apples or cherries. I did a lattice pattern with small cut strips of the crust. I also took a smaller can and cut smaller circles with an X in the middle to place on top of the pies (The rotel can I used was the perfect size for a pie top) And I also tried to cut an apple shape but I only did that twice because it didn't really turn out how I wanted it to. 

The apple filling was quick and easy to bake, the cherry however expands and made a bit of a mess it took some trial and error to figure out the best amout to fill. I found that just three or four cherries in the middle worked best.


These pictures aren't all that great I kinda decided half way that I should take pictures so I can blog it. And though I used a cupcake maker, a muffin tin will work just fine but keep an eye on those cherry pies. 

There you have it, my first food post yay! I'll get better at doing this and taking better pictures and get better at remembering I have somewhere to share my recipes. I hope you liked it and maybe you'll make some mini pies yourself! 

Love, 
Mickey 

Monday, January 13, 2014

Keep Moving Forward

Dear Mocha

Sometimes life really sucks or it sure seems that way. Sometimes life gets tough and you go through things that really test your limits. Sometimes you get to a place where you just want to scream why me and give up. Sometimes your goal seems impossible. Most of the time it's these tough times that make you a better person. Most of the time it's these rough patches that you really shine because it's then that you see how courageous and strong you really are. 

When life gets difficult the hardest thing to do is keep moving forward. But you have to remember that it's going to get better if you keep moving forward. Whatever you are going through, you have to pick yourself up and keep going. Why? Because going backward is impossible and staying still will drive you mad, so your only option really is to go mad or move forward.

Success stories aren't success stories without struggle. Anything worth having or worth doing isn't easy. Even though it's hard to see it now it will get better. By the end of it you'll be happy you went through whatever you did because it will make you a better person. Every beautiful sculpture starts as a plain block of stone with a little dedication, sweat, and hard work it becomes something beautiful. That's what you have to view these impossible times as. It's just chipping away the negative to become your beautiful, better self. One day you'll look back from a better place and be proud of what made you the person you are and this will only be a chapter to your story. Just don't forget to keep your head up and keep moving forward.

Keep moving forward is such a simple phrase but it's what I've lived by and still remind myself. When everything seems impossible just keep moving forward, I know you can, and you'll be glad you did. 

Taken from Meet the Robinsons a Disney movie with the theme of 'keep moving forward' one of my favorite movies

Sunday, January 12, 2014

Current Favorite Makeup Products

Here is my everyday makeup using all of the products mentioned in this post including Revlon's matte Balm in Elusive

Hello I haven't really figured out my posting schedule. But I love makeup and my mom has made me aware that Mocha spends all her allowance on makeup haha (Me too girl). So I thought Id share some of my favorites, particularly my drug store more low cost makeup. I am all for dupes and non expensive products that look or do the same as a high end products. As much as I love some of the high end products, I am definitely more of a drug store makeup shopper. There are a couple high end items I'm willing to splurge on, however I don't see a point on spending more on something you could get for less. So here are some of my current favorite makeup products I'm using daily and in love with

Stay Matte by Rimmel Foundation: 
My color is 004 Sandstorm
I have been in love with this foundation for awhile. If you have oily or shiny skin I highly recommend this. It creates a soft even matte complexion. It's inexpensive and works beautifully. I use it over my foundation or bb cream. You don't need to much for it to do its job! Love love love. 

Carmex soothing lip balm in strawberry:
Is chapstick considered makeup? I don't know but for me chapstick is essential, I hate chapped lips! I can't stand dry lips or dry skin for that matter. This Chapstick is always in my purse and in my desk at work. I've tried and used all kinds of chapsticks and brands, Carmex is still my favorite and works best for me.

Revlon Balms:
Just Bitten Kissable Balm from left to right Precious, Rendezvous, Lovesick 
Colorburst matte Balm from left to right Elusive, Sultry 
I have the Just Bitten in three different colors and love them. Revlon just came out with a new matte line. I love a good matte lipstick so obviously had to try them. I got one color and I loved it so I went and got another. I want them all but they are about $9. 

Face Glow Kit pallet by Love and Beauty:
I am obsessed with this pallet! I got it at Forever 21 recently. I've used it everyday (that I've worn makeup) since I got it. It gives you a nice glow. The bronzer, blush and highlighter have a touch of shimmer. It builds up nicely of if you just want a touch of shimmer in certain areas. The highlighter is my favorite part. It works beautifully. 

Brow Fix Brow Kit by Milani:
My color is 01 Light
I'm not great at doing my brows I'm honestly still learning. Right now I just add a little to fill in the empty spots and make them appear even and full. A more natural brow is more me than the a super defined brow. Which is exactly why I love this brow kit. The brush that comes with it is perfect to build color and the color isn't too pigmented. I can just brush on a little for a more natural brow or build it up. If you are a bit of a brow novice like I am this is a great product. 

Honorable mention to the tinted Burt's bees and the new medicated baby lips.
Those are the items I'm currently using daily and in love with. If you have any questions about any of them or other products I use or how I use them comment below and let me know! 


Love,
Mickey 


Wednesday, January 8, 2014

Winter Sweater Inspired Nails and I Love Nail Art Stylo Review


Just after Christmas I did a Christmas sweater design on my nails. I took pictures so I could share with you how I did them. Here are some pictures I used to get inspiration I got them all from Pinterest. Whenever I do any fun designs on my nais I take to Pinterest first to get ideas and inspiration. Which usually results in inspiration overload/all of these are so much better than I could ever do I give up. But one thing about nail design is most people think it's awesome that you even try, even if they don't look the best, you attempted. So what your left hand looks like a kindergardener did it you tried right? Right? That's my logic anyways.


These are the colors I used. I don't have a brand favorite when it comes to nail polish I just pick based on colors. 

Then I simply painted my nails similar to the inspiration pictures above. Using two to three coats.


First thing I did was use a matte top coat on my ring fingers I got it from Walmart by Hard Candy. I'm in love with it!


Then I started the design on my pinky. I did 5 small hearts. I made these hearts by making two dots with a nail art polish in black 


Then made a V connecting theses two dots

Next I filled in the top area where the dots were to make it look more like a heart. I did kind of like a stippling motion to fill in the heart.


I continue this technique to make two more hearts that are align with the two hearts I made previously. (Finished picture to follow) 

Next I did my pointer finger. I tried to make a snowflake like thing. This first thing I did was paint 1 dot right in the middle. 


Then I made 6 lines coming from that middle point. 

Then at the end of each line made i made two diagonal lines in each direction almost as if I was drawing the end of an arrow. I don't know if that description made sense luckily I took pictures

Since my fingers/nails are so tiny I couldn't do any of the designs shown in the inspiration pictures so I did a dot at the end of each line and in between each line. This wasn't my best work but I got the point across I think..

Next was my middle finger. By the way I don't know if there was any logic in the order I did this. Anyways on my ring finger I tried out this new nail paint pen. I was excited to use this it was cheaper than some similar products and looked easy to use. Since it is indeed a pen there wasn't a techinque to this I just drew something similar to the inspiration pictures.


The color I chose was pearly white and the color ended up not being that pigmented so I went back over what I drew with a white nail art polish. 
Next on the matte black nail (the ring finger) I drew a little moose. Again there wasn't really a technique since it was a pen. 
The pearly white over the matte black I though was cute so I didn't go over it with the white. Once all designs and both hands are done I used Q-tip with nail polish remover to clean up around my nails and applied a top coat. On all the nails except the matte nail so it would stay matte 
Then you are finished with your cute winter nails. 
I think they turned out pretty cute. I loved the neutral colors used for this design I also love that it looks Wintery without being christmasy. 

I love nail Art Stylo Review:
I liked how easy it was to use but I didn't love the color. It was not pigmented enough and you couldnt really build up on it to build the color. You can't really get a thin line but it does make great dots The next day, on the matte nail that I didn't apply a top coat, got messed up. The design partially desappeared. I did not love that at all.

For the most part it served it's purpose if you use top coat over it. I am willing to try another color but with little expectation.

Hope my rambling descriptions helped you in someway. Let me know if you try this or the I love nail art stylo at home! 

Love, 
Mickey